![]()
![]()
![]()
![]()
![]()
![]()
![]()
![]()
![]()
![]()
 |
 |
|
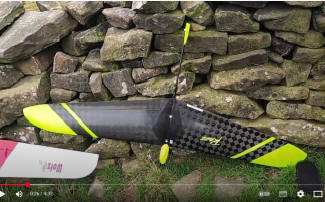
The turn of the year to 2025 brought with it some nice weather but calmer wind conditions. Don’t get me wrong, we had some blustery days, but more calmer days overall. It was on such days that
whilst I had models to fly in light winds, I wanted something that I could still
chuck around, or something that I could possibly fly from some small sand dune type
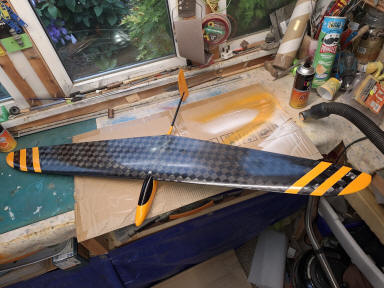
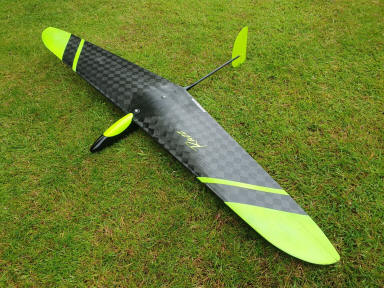
hills and have lots of fun. I have seen people flying Ahi’s, a great model, very manoeuvrable, but not sure that’s my bag. I wanted something that would suit my type of flying, can groove around, but still offer close-in aeros. I remember having a Dream flight Alula Mk1, a tailless design, which was good, but it only came out on really calm days, I've even got a RES model, but again, not exciting to fly and a bit fragile. So many models are either light conditions or high wind designs, not many are out there, as far as I’m aware, that covers both in one machine. Given that I have quite a few tailless designs to my CV (I like tailless designs…..), I set to working out what would turn my normal design pocket rocket specification into a close-in aerobatic wing, but one that could still take on a bit of a blustery day. First off, was deciding on an aerofoil section that would be suitable. I remembered that a previous DLG model (Blaster) that I flew, had a really good speed range. It would fly slow but yet would give a good account of itself when flown in winder conditions especially if the aerofoil had a little reflex (speed) dialled in on the ailerons. It even fared well on the slope. As I didn’t want a pocket rocket, per se, I ruled out some previously aerofoils that I’ve used; MH45, PW51 etc, both very fast, no, I wanted something different to give me a wider speed range. Searching my Profili 2 aerofoil library I found a Mark Drela DLG wing section that seemed, visually at least, partly reflexed. Having quickly looked at the initial data I decided to send this to my CNC foam cutter and cut a few sample foam ribs. Feeling that I would probably need a little more reflex for a tailless design, I then modified the chosen aerofoil and set an additional reflex of 1.5 degree, which looked about right. Other considerations was that of wing sweep. I wanted something manoeuvrable at slower speeds. Forward swept wings seems to aerodynamically enhance roll control, much like the Dream Flight Alula. sweep back would make the wing a little more stable and possibly faster. The first wings was set at 40” span (I know, that’s old school, but then I am getting on a bit), ok then, ~1.01m. Well I was using an off-cut of foam, plus my small original Wotzat design also has a 40” span, so I could directly compare this new wing to that of the Wotzat. The wing dimensions were input to the CNC cutter and a set of closed cell foam cores were quickly created, the wing tips of each panel were shaped to provide a semi elliptical wing tip. Not only does it make it look aesthetically pleasing it also has the advantage of reducing tip vortices and thereby, a reduction in drag. The application of a 6mm hard balsa root rib through which to provide a hard point for the wing bolts and 12k carbon tows for the leading edge and Peel Ply for the living hinge. The mylars were cut and waxed and laid up with a couple of layers of light glass cloth and epoxy which were assembled on either side of the foam cores and put in the vac bag. Basically a glass foam glass sandwich. 24hrs later, the panels were taken out of the vac bag and put in the airing cupboard to keep warm for a couple of days to continue curing before releasing the mylars from the wing. The Reveal: Releasing the mylars was a pleasure. A nice finish to the wing panels, a light layup, but still quite strong. The wings were trimmed, round servo holes cut and Elevons released allowing the Peel Ply to operate as a living hinge. The panels were joined with a small amount of dihedral. The join was reinforced with my usual diamond shaped glass cloth top and bottom. This works well to spread the load and not distract too much from the wing profile as it can be blended to the aerofoil shape much better than glass joining tape. I was not in a position to
make a new lost foam fuselage but had a small balsa fuselage that could be
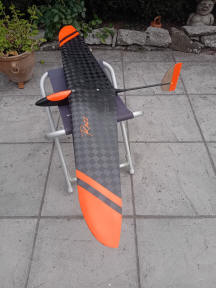
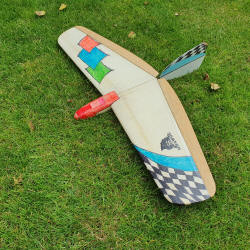
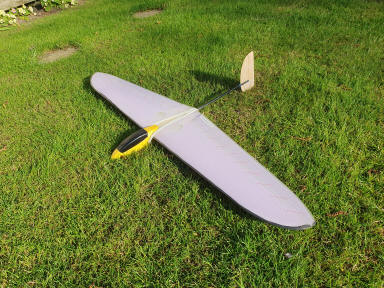
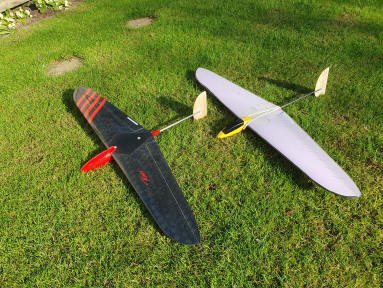
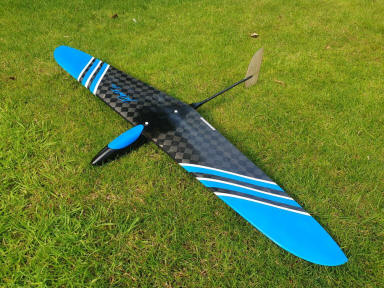
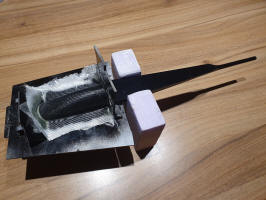
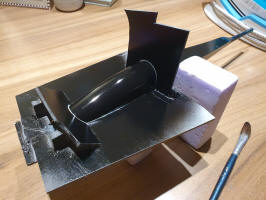
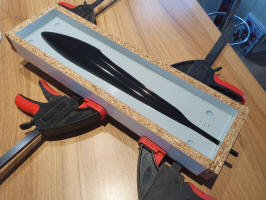
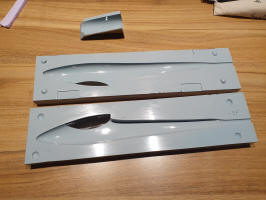
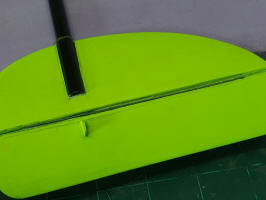
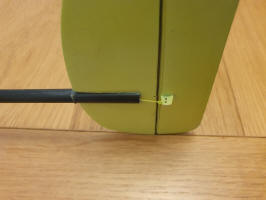
adapted with a tail boom to get the wing in the air quickly. A Balsa fuselage, an 8mm uni-carbon tube and a 3mm balsa fin joined together easily and provided a fairly attractive fuselage. I didn’t use wing bolts in the end as there was not enough of a fuselage to install captive nuts so I improvised. A 3mm carbon rod in front of the wing to which rubber bands could be attached, the other end of the bands simply slid over the fin and is retained by the tail boom behind the wing. Not pretty, but it worked! A 300mAh NiHm battery and small 4ch receiver and 2 high Tech HS 45 servos - its what I had in my servo box and had been there for many years, un loved, so they now had a purpose and were adequate for the job. The CG was calculated for 17, 18 and 19% of the average chord. I set the cg at 18% with just a small amount of lead up front with the AUW coming out at 279g (9.8oz) giving a wing loading of 5.8 oz/ft Sq – Result! But would it perform in blustery conditions??? 1st Flights: The day of the maiden flight was a sunny day, Easterly winds, quite calm at my home but once up on the hill the conditions a little way back from the slope edge were between 8 mph and 14mph, but at the compressive edge of the hill it was gusting to 23mph at times. The first thing I noticed was the model needed a little more reflex (up Elevator) to hold level flight given what seemed like a little nose heavy. I had already set up a number of different throws for the Elevons through use of a 3 position rate switched, so I quickly found the right responses. A quick and uneventful landing saw me tweaking the CG and trailing edge reflex setting (Up trim) and it was back to the front of the hill for another launch. This time, the launch was straight and the model quickly picked up speed. Handling was good, the stall was almost non-existent, even with full up elevator held in, it just went into a state of hyper-stalls, (Gently nodding) but when released, the model quickly accelerated putting in quite a lively performance. It needed a tweak to the Aileron differential to make the rolls more axial, but otherwise the model seem to have the good performance that I was hoping for. Subsequent flights on the day had me stretching the flight envelope to speed runs, the blustery conditions didn’t affect the model too much, it remained quite stable. Close-in, it was performing rolls, loops stall turns way back from the edge of the slope, almost over my head. Subsequent days of flying the new model did not disappoint. It worked well in light conditions but retained its energy when flown with higher wind speed, carving turns saw the model accelerate in the turns and half pipes providing more height than before on each side. Reflection: The finish of the glass wing was good, albeit a little fragile, already having a few dimples in the surface from mishandling during its manufacture. Reflecting on the first flights I believe that I had chosen a suitable aerofoil but the trimmed position of the elevens suggested that additional reflex was needed. A new wing was cut with a little more reflex, now at 2 degree. Prototype 2….. The new wing panels were cut with the additional reflex, and 88g Spread tow carbon used for the skin which was underpinned with 49g glass cloth and a fine Kevlar hinge this time. The wings were joined in the same way with 10mm of dihedral under each wing tip. A new fuselage was then produced using a lost foam technique. This technique requires a foam fuselage shape to be carved and sanded, then wrapped in glass cloth and epoxy. Once cured, the foam is removed from inside leaving what is now an epoxy glass finish. Installation of an 8mm uni-carbon tube and a fin that consisted of 3mm balsa with the edges recessed and carbon tows wrapped around its circumference. Once this was cured, I sanded a slight symmetrical aerofoil shape feathering onto the carbon edges which was then glassed and vac bagged with 25g cloth which provided a really nice and strong finish. Clearly the fuselage is heavier than the initial balsa fuz, but this was still a development model. If I were to mould a fuselage, I am sure I could reduce the fuz weight by at least 30%. The whole model came out at 398g (14 oz), over 100g heavier than the first model, but it still represented a fairly good wing loading (9.5oz/ft sq). The maiden flight of the 2nd model didn’t disappoint. It was a winder day than previous and the model performed extremely well. Indeed, given the extra weight, it was quick when pushed, with it quickly gaining speed out of turns. Feedback: I’ve let other people fly these two models and both said they liked its performance and showed some interest in obtaining one of their own which was encouraging…. no pressure then….. . Subsequent days out on different slopes have resulted in fellow modellers discussing its merits behind me while I’ve been flying and plenty of interest in the model. It does help having the spread tow carbon finish for them to ogle and drool over – yes, bragging rights ……. Given that the carbon wing is a little heavier than the first glass version, I decided to increase the wing span to 1.2m with a slight change in layup, still finished in spread tow carbon but with 25g cloth underneath to reduce overall weight. The two panels came out at just 0.8g difference and once trimmed this was further reduced to 0.4g difference, with each panel weighing circa 86g apiece. This new larger wing has also been married up to the previous lost foam fuselage and its encouraging that even though it’s a larger wing, it came out at a reduced AUW of 7.5oz / ft sq. Next time I can get out to fly, hopefully in a few days time, the two different carbon wings and the same fuselage will allow me to compare performance directly between the two. Progress: Well, time has now moved on, with many flights taking place on different slopes with encouraging results. I had the misfortune of a mid air collision with the new model, the other model hitting my uni carbon tail boom. It looked as though I’d got away with little, if any damage. Well, that was until I pick the model up and twisted the tail. The whole uni-carbon tail boom had split lengthways but had kept its integrity to get model down safely. Trying to drill out the remnants of the uni-carbon, had me damaging the lost foam fuz, which would have taken a lot of effort to repair. This did me a huge favour really. I didn’t spend too long coming up with a new fuselage shape fashioned out of block balsa for the plug for a new fuselage mould. I've made the mould so as to use an internal bladder, essentially to inflate a balloon to push the glass and seams into place during the cure process of each fuselage. This results in a nicer and consistent finish inside the model. I have used this technique on both the Wotzat and Hotshot fuselage moulds and it works well resulting in less hassle when joining the two halves of the fuselage and a better finish.
I made the canopy mould directly from the fuselage plug prior to laying up the actual fuselage mould. I had also sourced some 8mm thin walled rolled / woven carbon tube for the tail boom - more resilient and lighter. The new fuselage incorporates
a 3d printed internal locator for the tail boom to ensure it aligns perfectly.
The canopy shell is recessed into the fuselage. It uses a 3mm flat carbon
leading edge locator glued into the canopy shell and a small magnet to the rear
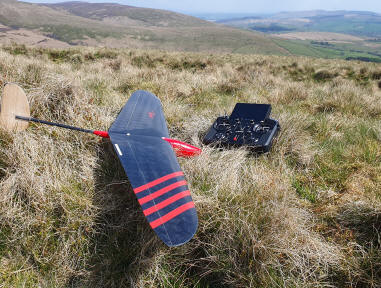
to lock it all in place. I have now fabricated two fuselages, one for each carbon wing set. I've even added some fluorescent paint to the wings to make them stand out better whilst flying. I fitted a rudder to the 1.2m wing model which has improved its manoeuvre capability. Applying rudder during close-in sharp turns can really get the model turned around quickly with very little loss in speed.
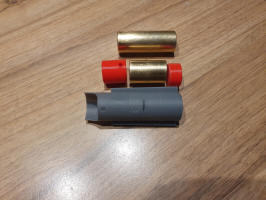
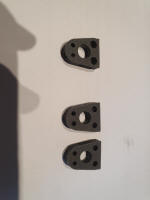
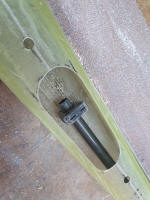
I had to fit very fine brass tubes into the fin and rudder for the 0.5mm wire torque rod to fit as the thin balsa was being damaged by the wire. The tubes make it better and allows for the removal of the spring if necessary. I made a 3d printed rudder servo mount for a small 7g servo that glues to the fuz side wall just inside the canopy hatch. The next model, I will explore the use of closed loop control or even a small gauge wire pushrod. Both models fly well in a good range of conditions. Indeed I have flown them in a low as 5 mph winds, albeit I needed to work the wind / hill to keep it going and they have performed well in wind speeds up to and in excess of 20 mph. Ballast??? I made a 3d printed ballast tube to fit to the 1.2m model. I have flown it with both additional 50g and 100g brass ballast, but to be honest, it just made the model able to penetrate the higher wind speeds, manoeuvres, were much bigger given the extra weight. but in such conditions close in aeros is probably not recommended. I've decided that whilst ballast is an option, I’d rather just limit the model to flying up to circa 20mph winds, in which it performs very well with no ballast. Thereafter, I have other models that I would want to fly in more gusty extreme conditions.
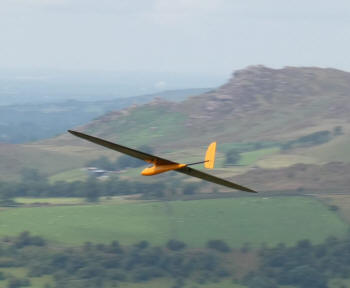
Verdict: Overall, I am so please with the new model now named RAZZ (A google search says the definition of RAZZ is “To Tease – Playfully”), which I think is an apt name for a model that evokes a playful mode of flying. Having now visited many different slopes and flown the Razz, I continue to receive some great encouraging feedback which has resulted in me making a few Razz models for others to own and play with...... Indeed, their feedback, and I quote is:
|
|
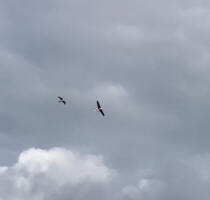
One of my friends while
flying his Razz model down at Leek and Moorland got a little more interest in
his model than he was expecting...... A Peregrine falcon decided to take a closer
look, maybe it didn't like the model, but it was all captured on video and is
somewhat entertaining....Click on the
photo below to see the video. I have also uploaded a youtube video of a Razz
flying session on Parlick fell. <<As promised, I've also uploaded a video on YouTube of a flying session on Parlick Fell, my local slope.....
|
|
All the feedback is rather humbling..... I'm taking mine out again to have some fun. See you soon.......
|
|
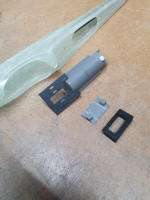
 The rudder is controlled by a
single pull wire / string transiting through the tail boom to the rudder
horn. This is made possible by the use of a torque spring fitted to the hinge
line of the rudder. This puts the rudder full throw to one side, the pull from
the servo hold the rudder central, or pulls past centre to fully oppose the
spring, giving full control movement.
The rudder is controlled by a
single pull wire / string transiting through the tail boom to the rudder
horn. This is made possible by the use of a torque spring fitted to the hinge
line of the rudder. This puts the rudder full throw to one side, the pull from
the servo hold the rudder central, or pulls past centre to fully oppose the
spring, giving full control movement.