![]()
![]()
![]()
![]()
![]()
![]()
![]()
![]()
![]()
![]()
![]()
| Evolan
- Concept Design to Moulded Model [Flight of the prototype No 2] [ Test flying complete] [Evolan Assembly instructions] |
|
Over the years having owned a number or moulded models, and scrutinised many more, wondering how hollow wings are actually made, How many layers of cloth, types of reinforcement and how are the wipers on the controls made….. Lots of questions.
To cut to the chase there are a few people out there that offer my kind of experience in the videos that they have made available and whom I could relate directly with what they were doing with some informative banter as they progress through their respective tasks. There are a few nutcases (meant in the nicest possible way) out there too, but while these offer a source of entertainment, they can often fill in the gaps of knowledge or at least present yet another question. The secret is to watch and learn; sometimes coming out of the experience with more questions than answers, but eventually the search yields the secrets.
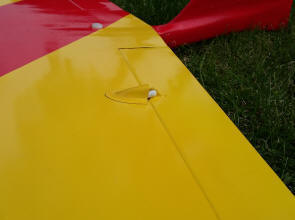
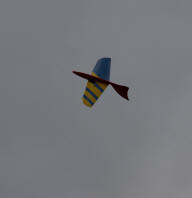
After a couple of days of curing in a warm room, the servo recesses were cut using a hole cutter and dremel router tool. The leading edge wing dowel and tube fabricated and installed and the Elevon controls cut free. This was also the first set of wings using new techniques that I managed a consistent method of getting the installed living hinge to work without the fuss – no hinge tape required this time! Even manufacturing and installing the wipers that seal the control surfaces. This really worked well as during the test flight, the model was almost silent when flown at speed, more on this later.
|
|
April 2016
It's been a while since I wrote about my flying wing, Evolan, so I though I'd better bring you up to date.
If I said that Evolan is a really special model, you probably would not believe me, but it's true. I take it on almost every trip to the slope and is definitely one of my favourites. In fact, on the few occasions that I've given the transmitter to my flying Buddy, Neil, it has been a challenge to get the Tx back off him.
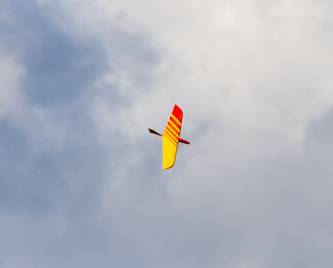
The glassed foam wing has proven to be quite durable and quite resilient to knocks. The model has been tweaked, benefiting from Differential Elevon on Roll. however, unlike most conventional models, most flying wings require more down than up aileron, Evolan is set 80% up, 100% down giving a nice smooth roll. The model raced around in most conditions, but initially suffered from lack of inertia in loops and bunts. Adding a little ballast on the C of G gave it the performance I was looking for.
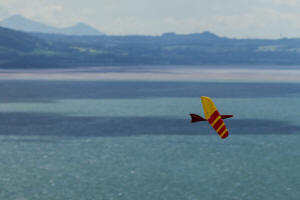
Last week I took the model down to Leek and Moorland, Staffordshire - a great range of slopes and whilst the conditions were fairly light and variable at "The Gate" slope site, Evolan ripped around when others were only just holding their own. The secret is to let it fly, let it move without the temptation to hold back the elevator, but that can be said for most models.
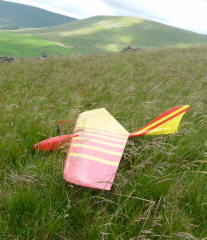
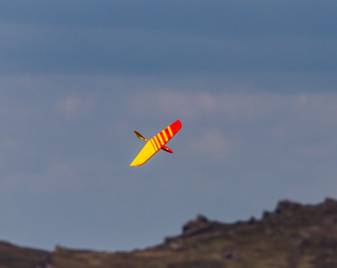
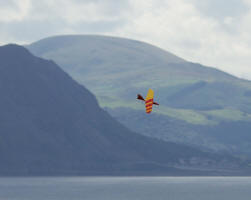
An impressive view, those are the Jodrell Bank telescopes in the distance. Given The flying wings' performance, and the encouraging comments from everyone that sees it fly, I am now progressing Evolans' design.
I have made a new fuselage, a little more
aggressive in appearance and one that can be moulding easily.
Before I commit to making moulds for the wing, as this is the model I want to fully mould, I have just one more trial to complete. I have already created a new wing with a different wing section just to compare their performance. Why you might ask?
Well, I have heard a lot about this new wing section, and that it achieved the world record for the fasted flying wing, then I have to give it a go.
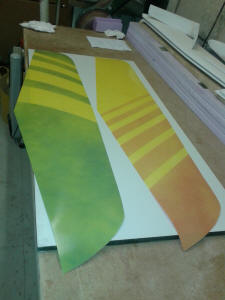
The wing planform is slightly different, rounding the tips a little more, but everything else remains the same. I have cut the cores and glued them together and painted the mylars yesterday. This morning, I laid up the glass skins and put them in the vac bag. These are now well on their way to curing, under their heated blanket. I'll switch it off tomorrow before going to work. Tomorrow night, I should be able to check on my handy work.
That's it for now. I'll report back soon........
Monday night (Next day) and time to check on my handy work.
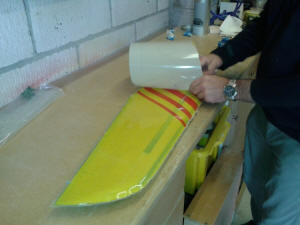
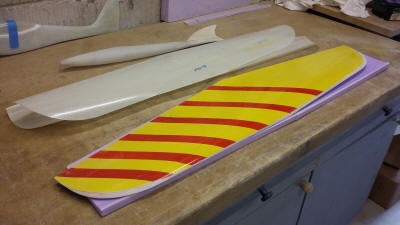
The wing was carefully extracted from under the quilt and electric blanket and removed from the vac bag. The moment you release the mylars is always a tense one. But I needed not to worry as the paint had adhered to the cloth and resin well and and came off the mylars cleanly leaving a high gloss finish. Unlike my initial attempt at painting the mylars on my first wing, this time I had layered the paint and finished off with undercoat leaving it overnight before laying up the wings. I am mightily impressed how bright the colours are on this new wing.
With a mylar lay up, there is always a little trimming and smoothing of the leading edge and tips and I had just finished this task before taking the photos. I will be touching up the leading edges with some coordinating paint, but I have now put the wing back in the outer foam blanks and weighted it down with a view to let the resin fully cure over the next few days before I cut the Elevons and release the hinge and cut the servo holes.
I will report back when this has been sorted.
------------------------------------------------- |
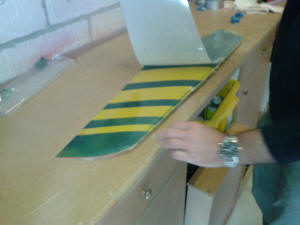
  A coupe of evenings in the workshop has seen the model totally re
painted. The initial paint job straight out of the mylars was good, but
glue fingers, really sticky masking
tape.... (that normally isn't the case) and other bumps and
scratches really messed up the paint finish, so I rubbed it down and
started again. I think the new colour scheme, although similar, work
better.
A coupe of evenings in the workshop has seen the model totally re
painted. The initial paint job straight out of the mylars was good, but
glue fingers, really sticky masking
tape.... (that normally isn't the case) and other bumps and
scratches really messed up the paint finish, so I rubbed it down and
started again. I think the new colour scheme, although similar, work
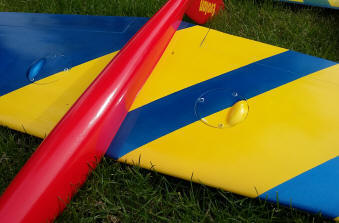
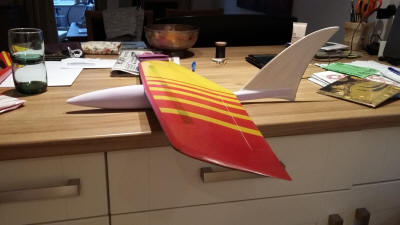
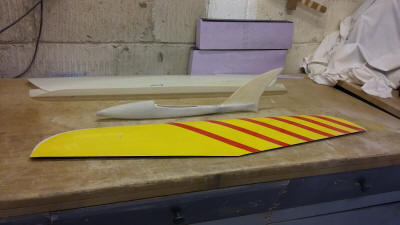
better.I also made the Elevon servos and control link a little more self contained and instead of control fairings for the servo arms I decided to keep most of the control arms in the wing, and used a servo cover with a bulge and a really small fairing on the control horn side of the wing. All up, I think this has worked really well. Take a look for yourself.
|
| 07 May -Warm, dry and a good breeze |
 The
conditions were good for a days flying and to get the air under the
Evolan Mk2 wings. I had completed the radio installation last night and
balanced the model on the
calculated C of G position. The
conditions were good for a days flying and to get the air under the
Evolan Mk2 wings. I had completed the radio installation last night and
balanced the model on the
calculated C of G position.Parlick Fell, my local slope was the venue and after the normal Saturday morning shopping, I ventured up the hill, and met one of the local modelling stalwarts, Ron, up at the top. No one else had turned out to fly, maybe put off by the constant 27 mph, gusting 32 mph Easterly wind. But it was warm and dry and the lift was remarkably smooth. mind you the Easterly face and the bowl to the left always provides good lift. That's why the para glider fraternity like it so much, but they had stayed at home given the wind strength. First of my models away for a test flight was a new little project which can be found on a different page. Pocket Rocket..... Next was to fly the original Evolan, primarily to gain an insight into how it flew in today's conditions as a benchmark to compare the new model against and this was done with no fuss and it flew well in the conditions.
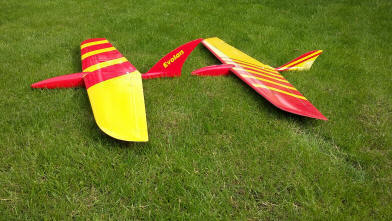
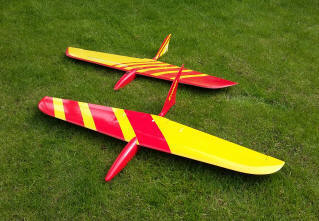
Subsequent flights saw the C of G moved forward 5mm and the Exponential on aileron tweaked over a number of flights and are now set at 75% Up, 100% Down, the opposite way to a normal conventional aircraft and its now pretty close to an axial roll. The model looks good in the air but does not seem quite as fast as the other Mk1 model, and it does have the yaw oscillations at slower speed that seems synonymous with a lot of tailless models . I had made the wing to fit both the new fuselage and the old one from the Mk1 so I swapped the wings over and flew both models again. The wings on the new fuselage displayed the same yaw issues, whereas both wings on the old fuselage, was good. To prove that the fin size needed to be enlarged to eradicate this problem, I taped the removable fin from my little experiment model onto the tail of the Mk 2 fuselage to increase its effective area and flew it again - problem solved!!! The first flights were promising, but the jury is out on which wing is the best all-rounder. At the moment I am airing on the side of the original wing, but again, we'll see over the next few weeks. I need to check on the parameter of each wing to make sure they are both the same percentage thickness etc I now have a list of jobs to do in the workshop to get this permanently sorted. however I think that you will have to agree, that the new model certainly looks like it means business. CW I'll report back again soon. 2016, saw lots of flying of my models, not least the Evolan. Indeed, the Evolan and the Midge were the models I preferred to take up the hill most days. I have had many flights in varied conditions with both version 1 & 2 of the Evolan. The fuselage and wings have been swapped between each resulting in the fin area of the 2nd prototype model being increased to stop the wobble in turns at slower speeds. Once the minor modification were complete and many more flights under my belt, I am really pleased with the outcome and have decided to progress the model to the moulding stage. The moulded model will feature the original wing section with the plan form and fuselage shape of version 2. I have made the fuselage and wing plugs and these now being processed to make the moulds. Succumbing to pressure during one of my visits to the Leek and Moorland slopes, I sold my 2nd prototype to a good friend, Mark Ollier who has really warmed to the model. Having tweaked it's trim to suit his style of flying, he never fails to turn heads when he flies the model, which I am told is most of the time during which, all you can see is a big grin on his face. In high wind conditions, Even at just an All Up Weight (AUW) of just 580g for the 1st Prototype and 620g for the 2nd proto type (Mark's model), the Evolan needs no ballast, just a little down trim and it comes alive easily coping with everything the slope and the weather throws at it. His trips to places like the Great Orme and flying in all conditions from light lift to gale force winds has always been followed up with a text message or email, often with photos. After one such trip he contacted me to tell me how well it flew, and I quote: "40+ mph winds plus Midge & Evolan = Bloody Awesome" Mark has really pushed the envelope to the extreme and never fails to impress onlookers with his flying of both the Midge and Evolan models resulting in many questions of; What is it? where did you get it from?, where can I get one? Well its here, at Slope dudes.
Watch this space for the fully moulded model nearing its production..... the Fuselage Mould is almost complete.
Jan 17, I have a number of projects on going at the moment, and steady progress is being made on each. I have now produce the Fuselage mould for the X-2, the first of the X-2 fuselages has not been used on an X-2 as the wing mould is still being sorted. It has however, been used on a new Project X, which has an obechi veneered wing which has been vac bagged and then glassed again to finish, making one very strong wing. The model is looking really good and has already been balanced and had a few test launches on the flat to make sure that it would fly straight and respond correctly. I have just to get it up the slope now, but the weather is being a little bit mean and cold presently. I have also made myself a new Midge, given that I sold my original prototypes back in October (boy have I missed these!). This also is ready for its inaugural flight. The fuselage mould for the Evolan has also been completed; this is in advance of when I expected to finish it. This is primarily because I was approached to provide a vac bagged wing and fuselage for the Evolan, so it was an opportunity to prioritise the fuselage mould. Just got to lay up the first fuselage now and make someone happy that he has got hold of one of these models.
Once I have sorted these out, it'll be
time to continue the
X-2
wing mould so I can develop the skills to then progress to the larger
wing mould of the Evolan. These are such exciting times given that I have got a collection of models that really get people talking when they fly, as they are unusual and perform very well in most conditions. Indeed, my X-1 (foam version of the X-2) was flown on Xmas day on "Gummers How" in the lake district in gusting 40+ mph wind conditions. A few clicks of down trim and it just accelerated away from the slope and whizzed around - loops, very quick rolls and all without making much of a sound, its a really quite model. One could also be excused thinking that it must have been ballasted up, but this was not the case, given it's size (26" w/s) and particularly light wing loading (9oz Ft/sq) even I was pleasantly surprised at how well it performed on the day. I didn't fly for too long on the day, the cold biting wind and the fact that I was on a walk with my good lady, but paused long enough to have a fly, before completing our circular walk followed by our festive picnic. As soon as the Evolan comes out of the mould I'll be back to give you an update........ Early Feb 17
I will be laying up another one soon, which will ultimately be mated with a fully moulded wing, but the moulds for this has yet to be completed. More info to come as the fully moulded Evolan progresses.
|
 Over
the years of building models, finding new techniques and just wondering
how do they do that, I have logged many questions in the mind vault
until the opportunity arose to either ask or discover the answers.
Over
the years of building models, finding new techniques and just wondering
how do they do that, I have logged many questions in the mind vault
until the opportunity arose to either ask or discover the answers.
 work for a while and I found my way
to YouTube in an attempt to discover some answers. There are many
threads / videos out there, all variations on a theme to achieving the
same goal. With my head full of questions an armed with my note pad, I
began my quest to learn, I set to work watching what I call “Trade
Training “ videos. Well, it beats day time TV by a long way…..
work for a while and I found my way
to YouTube in an attempt to discover some answers. There are many
threads / videos out there, all variations on a theme to achieving the
same goal. With my head full of questions an armed with my note pad, I
began my quest to learn, I set to work watching what I call “Trade
Training “ videos. Well, it beats day time TV by a long way…..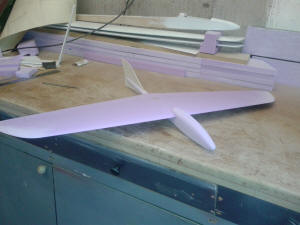

 After
a little design work, and keeping the design relatively small to ensure
that I didn’t waste too much material during the development and
learning process, the wings were cut from closed cell foam (Floor mate /
Jackodur -extruded polystyrene) to the chosen plan shape and Aerofoil
(MH45). With the necessary conduits installed for servo wiring, the wing
halves were assembled as a once piece wing. The Mylars were cut to allow
the glass to be transferred to the foam cores.
After
a little design work, and keeping the design relatively small to ensure
that I didn’t waste too much material during the development and
learning process, the wings were cut from closed cell foam (Floor mate /
Jackodur -extruded polystyrene) to the chosen plan shape and Aerofoil
(MH45). With the necessary conduits installed for servo wiring, the wing
halves were assembled as a once piece wing. The Mylars were cut to allow
the glass to be transferred to the foam cores. 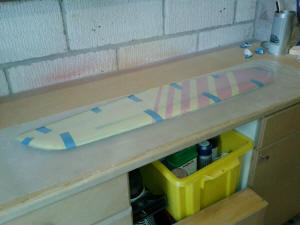
 The
fuselage was the result of another lost foam exercise, used on some of
my other models (SmArt, Volitan). The shape was carved and sanded in
closed cell foam, wrapped with epoxy glass and once cured, the foam was
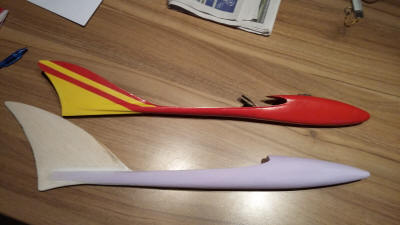
removed leaving a one-off glass fuselage. The fin was fabricated out of
3mm Balsa and covered in 25g cloth and resin. Once cured, it was trimmed
and install in the fuselage tail boom.
The
fuselage was the result of another lost foam exercise, used on some of
my other models (SmArt, Volitan). The shape was carved and sanded in
closed cell foam, wrapped with epoxy glass and once cured, the foam was
removed leaving a one-off glass fuselage. The fin was fabricated out of
3mm Balsa and covered in 25g cloth and resin. Once cured, it was trimmed
and install in the fuselage tail boom.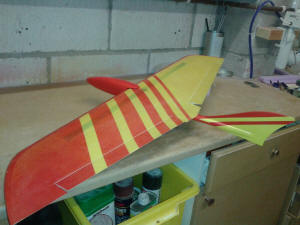

 After
a thorough range check of the Mk 2, its initial launch of the new model
was back from the slope edge and it didn't go very far as It was a
little sensitive on the elevator and not enough reflex for the initial C
of G position which was a little forward, or so I thought. Second
launch and it was away, but again a little over sensitive on the pitch
control. Although I had copied the other Evolan control settings, it was
clear that this was different and certainly needed the exponential
sorting out. After a couple of minutes I landed the model, there was so
much lift that it was difficult to land any models but I got it down
without too much hassle albeit a little fast.
After
a thorough range check of the Mk 2, its initial launch of the new model
was back from the slope edge and it didn't go very far as It was a
little sensitive on the elevator and not enough reflex for the initial C
of G position which was a little forward, or so I thought. Second
launch and it was away, but again a little over sensitive on the pitch
control. Although I had copied the other Evolan control settings, it was
clear that this was different and certainly needed the exponential
sorting out. After a couple of minutes I landed the model, there was so
much lift that it was difficult to land any models but I got it down
without too much hassle albeit a little fast. 
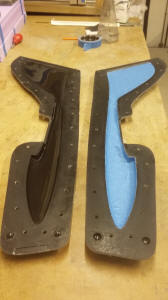
 The
mould has been polished and prepared for the first lay up over the next
few days seen here with a midge
fuselage mould also ready to lay up.
The
mould has been polished and prepared for the first lay up over the next
few days seen here with a midge
fuselage mould also ready to lay up.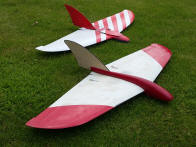
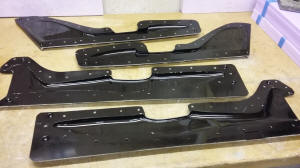
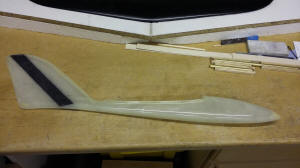 Over
the last weekend, I laid up two fuselages. A midge fuselage and of
course, the first Evolan fuselage. It is always a worrying moment when
you come to release the mould, but I need not have been worried, the model
came out of the mould fairly easily and with a reasonably good finish. I
am very please with the outcome. This one is already spoken for, and has
already been despatched to its new owner with a foam glassed wing.
Over
the last weekend, I laid up two fuselages. A midge fuselage and of
course, the first Evolan fuselage. It is always a worrying moment when
you come to release the mould, but I need not have been worried, the model
came out of the mould fairly easily and with a reasonably good finish. I
am very please with the outcome. This one is already spoken for, and has
already been despatched to its new owner with a foam glassed wing.